Stanford CS144 Lab 0: Networking warmup
Stanford大学的CS144 lab要求我们实现一个TCP。CS144的课程我觉得可以配合《自顶向下》来学习,它是目前最好的中文的计算机网络书籍了。《自顶向下》中采用的是五层模型,当然在CS144中介绍了四层模型和七层模型。华科的计算机网络课程是根据《自顶向下》来备课的,如果有空的话,还可以听一听华科的计网mooc。既然都写到这里了,我们在前言来聊聊计算机网络模型:
四层网络模型
链路层:定义单个链路如何传输。
网络层:选择合适的网间路由,确保数据及时到达。常见的协议有IP协议。在internet中连接局域网和广域网是路由器。
传输层:端到端的通信,负责向两台主机之间提供数据传输服务。传输层的主要协议有传输控制协议TCP和用户数据协议UDP。
应用层:通过应用进程之间的交互来完成特定的网络作用
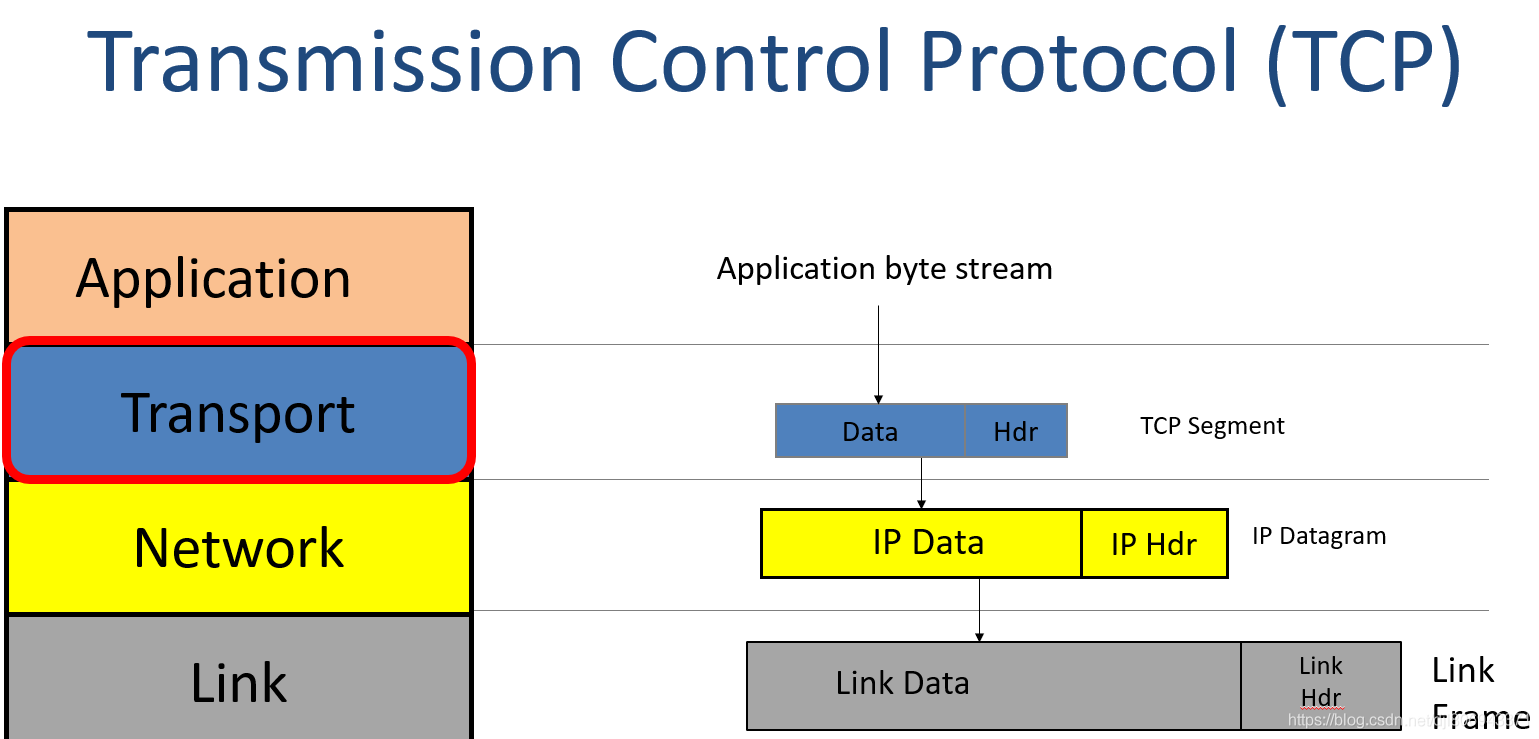
五层模型
五层模型把四层模型的link层分为了数据层和物理层。
数据层:数据层的作用是在物理层提供比特流服务的基础上,建立相连节点之间的数据链路,通过差错控制提供数据帧在信道上无差错的传输。
物理层:实现相邻计算机节点之间的比特流的透明传输。
七层模型
表示层和会话层实际上是和应用层一起实现的。
为什么网络协议要分层呢?
- 层层封装,易于实现和维护;
- 有利于协议等标准化的制定。
今天在连接网络的时候发现一个很有意思的现象,我用设置了全局代理,并用v2ray连接了代理服务器,之后我用ping命令ping google.com,却ping不通,原来v2ray是作用于会话层,而ping是作用于网络层,所以我们即使连接了代理服务器却不能ping通google.com。
我们常用的v2ray、shadowsocks等客户端位于会话层,只能代理应用层的应用,当然我们也可以通过一些软件去实现真正的全局代理,如:SSTap、Proxifier、tun2sock2、SocksCap等。
Fetch a web page
该部分要求使用telnet手动获取网页,具体步骤如下:
1.键入telnet cs144.keithw.org http得到如下响应(http可替换为80):
2.继续键入GET / hello HTTP / 1.1。 这告诉服务器URL的路径部分。
3.继续键入Host:http://cs144.keithw.org。这告诉服务器URL的主机部分。
4.再按一次Enter键 这告诉服务器您已经完成了HTTP请求。
实验结果如下所示:
我们知道,telnet是作用于应用层的一个应用,通常用来进行远程请求。当远程请求获取成功,我们通过GET / hello HTTP / 1.1获取超文本文档,这里的HTTP是超文本传输协议。这里我们再来讲讲HTTP不同版本协议的区别:
HTTP 1.0和HTTP 1.1的区别
长连接
HTTP 1.1支持长连接和请求的流水线操作。长连接是指不在需要每次请求都重新建立一次连接,HTTP 1.0默认使用短连接,每次请求都要重新建立一次TCP连接,资源消耗较大。请求的流水线操作是指客户端在收到HTTP的响应报文之前可以先发送新的请求报文,不支持请求的流水线操作需要等到收到HTTP的响应报文后才能继续发送新的请求报文。
缓存处理
在HTTP 1.0中主要使用header中的If-Modified-Since,Expires作为缓存判断的标准,HTTP 1.1引入了Entity tag,If-Unmodified-Since, If-Match等更多可供选择的缓存头来控制缓存策略。
错误状态码
在HTTP 1.1新增了24个错误状态响应码
HOST域
在HTTP 1.0 中认为每台服务器都会绑定唯一的IP地址,所以,请求中的URL并没有传递主机名。但后来一台服务器上可能存在多个虚拟机,它们共享一个IP地址,所以HTTP 1.1中请求消息和响应消息都应该支持Host域。
带宽优化及网络连接的使用
在HTTP 1.0中会存在浪费带宽的现象,主要是因为不支持断点续传功能,客户端只是需要某个对象的一部分,服务端却将整个对象都传了过来。在HTTP 1.1中请求头引入了range头域,它支持只请求资源的某个部分,返回的状态码为206。
HTTP 2.0的新特性
- 新的二进制格式:HTTP 1.x的解析是基于文本,HTTP 2.0的解析采用二进制,实现方便,健壮性更好。
- 多路复用:每一个request对应一个id,一个连接上可以有多个request,每个连接的request可以随机混在一起,这样接收方可以根据request的id将request归属到各自不同的服务端请求里。
- header压缩:在HTTP 1.x中,header携带大量信息,并且每次都需要重新发送,HTTP 2.0采用编码的方式减小了header的大小,同时通信双方各自缓存一份header fields表,避免了header的重复传输。
- 服务端推送:客户端在请求一个资源时,会把相关资源一起发给客户端,这样客户端就不需要再次发起请求。
GET / hello HTTP / 1.1就是我们的请求行,请求行包括请求方法,请求URL,HTTP版本协议。那么我们又不得不讲一讲请求头了,请求头包括若干个属性值,服务端据此获取客户端的信息。至于请求体,它承载多个请求参数的数据。再来说说GET和POST的区别:
作用
GET用于获取资源,POST用于传输实体主体
参数位置
GET的参数放在URL中,POST的参数存储在实体主体中,并且GET方法提交的请求的URL中的数据做多是2048字节,POST请求没有大小限制。
安全性
GET方法因为参数放在URL中,安全性相对于POST较差一些
幂等性
GET方法是具有幂等性的,而POST方法不具有幂等性。这里幂等性指客户端连续发出多次请求,收到的结果都是一样的.
而上述图片返回的则是响应报文。响应报文的响应行包括报文协议及版本,状态吗及状态描述。响应头也是属性值,至于响应体,则是我们请求的需要的数据。我们看到响应代码是200,我们来说说常见的状态码:
| 状态码 | 类别 |
|---|---|
| 1XX | 信息性状态码 |
| 2XX | 成功状态码 |
| 3XX | 重定向状态码 |
| 4XX | 客户端错误状态码 |
| 5XX | 服务端错误状态码 |
Writing webget
利用TCPsocket与Host建立连接,发送请求头,达到获取网页的目的。
众所周知,请求头为
GET path HTTP/1.1
Host: host故write函数里面的字符输入为sock.write("GET " + path + " HTTP/1.1\r\nHost: " + host + "\r\n\r\n\r\n");
webget.cc代码如下:
void get_URL(const string &host, const string &path) {
    // Your code here.

    // You will need to connect to the "http" service on
    // the computer whose name is in the "host" string,
    // then request the URL path given in the "path" string.

    // Then you'll need to print out everything the server sends back,
    // (not just one call to read() -- everything) until you reach
    // the "eof" (end of file).
    TCPSocket sock;
    sock.connect(Address(host, "http"));
    sock.write("GET " + path + " HTTP/1.1\r\nHost: " + host + "\r\n\r\n\r\n");
    sock.shutdown(SHUT_WR);
    while(!sock.eof())
        std::cout << sock.read();
    sock.close();
}
实验结果:
An in-memory reliable byte stream
该部分要在计算机的内存中实现一个提供可靠的有序字节流的抽象。该抽象充当运输层与应用层的连接。也就是应用层从socket中读取数据的部分。其中,byte_stream的byte_read函数将byte_stream中的数据发送到应用层,byte_write函数将有序的而数据写入byte_stream。
该抽象使用deque实现。
对于write函数,我们将data中的数据写入deque,返回本次实际写入的数据长度。注意 capacity 代表字节流容量,写入时不能超过剩余可用空间。代码如下:
size_t ByteStream::write(const string &data) {
    DUMMY_CODE(data);
    //取其中的较小值,data的长度,bytestream的容量和deque长度的差,保证其不超过bytestream容量
    size_t lens_byte = std::min(data.size(),stream_capacity - byte_stream.size());
    //在deque的末尾插入data的数据
    byte_stream.insert(byte_stream.end(),data.begin(),data.begin()+lens_byte);
    //写入的长度增加
    byte_written+=lens_byte;
    return lens_byte;
}
对于read函数,我们只需要弹出len个数据,注意是len和deque.size()的较小值。代码如下:
std::string ByteStream::read(const size_t len) {
    DUMMY_CODE(len);
    //找到要read的长度byte_stream长度的较小值,尽可能地读
    size_t lens_byte = std::min(len,byte_stream.size());
    //读取数据
    std::string n(byte_stream.begin(),byte_stream.begin()+lens_byte);
    //将读取后的数据弹出
    pop_output(len);
    return n;
}
byte_stream.hh代码如下:
#ifndef SPONGE_LIBSPONGE_BYTE_STREAM_HH
#define SPONGE_LIBSPONGE_BYTE_STREAM_HH

#include <string>
#include <queue>
//! \brief An in-order byte stream.

//! Bytes are written on the "input" side and read from the "output"
//! side.  The byte stream is finite: the writer can end the input,
//! and then no more bytes can be written.
class ByteStream {
  private:
    // Your code here -- add private members as necessary.
    size_t stream_capacity;//容量大小
    size_t byte_written;//写入
    size_t byte_read;//读取
    std::deque<char> byte_stream;//快速插入和删除
    bool _end;//结束标志
    // Hint: This doesn't need to be a sophisticated data structure at
    // all, but if any of your tests are taking longer than a second,
    // that's a sign that you probably want to keep exploring
    // different approaches.

    bool _error{};  //!< Flag indicating that the stream suffered an error.

  public:
    //! Construct a stream with room for `capacity` bytes.
    //构造函数,构造一个带有容量字节空间的流。
    ByteStream(const size_t capacity);

    //! \name "Input" interface for the writer
    //!@{

    //! Write a string of bytes into the stream. Write as many
    //! as will fit, and return how many were written.
    //! \returns the number of bytes accepted into the stream
    //写入字节,返回字节的数量
    size_t write(const std::string &data);

    //! \returns the number of additional bytes that the stream has space for
    //
    size_t remaining_capacity() const;

    //! Signal that the byte stream has reached its ending
    //结束输入
    void end_input();

    //! Indicate that the stream suffered an error.
    void set_error() { _error = true; }
    //!@}

    //! \name "Output" interface for the reader
    //!@{

    //! Peek at next "len" bytes of the stream
    //! \returns a string
    std::string peek_output(const size_t len) const;

    //! Remove bytes from the buffer
    void pop_output(const size_t len);

    //! Read (i.e., copy and then pop) the next "len" bytes of the stream
    //! \returns a string
    std::string read(const size_t len);

    //! \returns `true` if the stream input has ended
    bool input_ended() const;

    //! \returns `true` if the stream has suffered an error
    bool error() const { return _error; }

    //! \returns the maximum amount that can currently be read from the stream
    size_t buffer_size() const;

    //! \returns `true` if the buffer is empty
    bool buffer_empty() const;

    //! \returns `true` if the output has reached the ending
    bool eof() const;
    //!@}

    //! \name General accounting
    //!@{

    //! Total number of bytes written
    size_t bytes_written() const;

    //! Total number of bytes popped
    size_t bytes_read() const;
    //!@}
};

#endif  // SPONGE_LIBSPONGE_BYTE_STREAM_HH
byte_stream.cc代码如下:
#include "byte_stream.hh"

// Dummy implementation of a flow-controlled in-memory byte stream.

// For Lab 0, please replace with a real implementation that passes the
// automated checks run by `make check_lab0`.

// You will need to add private members to the class declaration in `byte_stream.hh`

template <typename... Targs>
void DUMMY_CODE(Targs &&... /* unused */) {}

using namespace std;

ByteStream::ByteStream(const size_t capacity) : stream_capacity(capacity),byte_written(0),byte_read(0),byte_stream(0),_end(false),_error(false){
    DUMMY_CODE(capacity);
}

size_t ByteStream::write(const string &data) {
    DUMMY_CODE(data);
    //取其中的
    size_t lens_byte = std::min(data.size(),stream_capacity - byte_stream.size());
    byte_stream.insert(byte_stream.end(),data.begin(),data.begin()+lens_byte);
    byte_written+=lens_byte;
    return lens_byte;
}

//! \param[in] len bytes will be copied from the output side of the buffer
string ByteStream::peek_output(const size_t len) const {
    DUMMY_CODE(len);
    return std::string(byte_stream.begin(),byte_stream.begin()+std::min(len,byte_stream.size()));
}

//! \param[in] len bytes will be removed from the output side of the buffer
void ByteStream::pop_output(const size_t len) {
    DUMMY_CODE(len);
    size_t lens_byte = std::min(len,byte_stream.size());
    byte_stream.erase(byte_stream.begin(),byte_stream.begin()+lens_byte);
    byte_read+=lens_byte;
}

//! Read (i.e., copy and then pop) the next "len" bytes of the stream
//! \param[in] len bytes will be popped and returned
//! \returns a string
std::string ByteStream::read(const size_t len) {
    DUMMY_CODE(len);
    size_t lens_byte = std::min(len,byte_stream.size());
    std::string n(byte_stream.begin(),byte_stream.begin()+lens_byte);
    pop_output(len);
    return n;
}

void ByteStream::end_input() {_end= true;}

bool ByteStream::input_ended() const { return _end; }

size_t ByteStream::buffer_size() const { return byte_stream.size(); }

bool ByteStream::buffer_empty() const { return byte_stream.empty(); }

bool ByteStream::eof() const { return _end&&byte_stream.empty(); }

size_t ByteStream::bytes_written() const { return byte_written; }

size_t ByteStream::bytes_read() const { return byte_read; }

size_t ByteStream::remaining_capacity() const { return stream_capacity-byte_stream.size(); }#include "byte_stream.hh"

// Dummy implementation of a flow-controlled in-memory byte stream.

// For Lab 0, please replace with a real implementation that passes the
// automated checks run by `make check_lab0`.

// You will need to add private members to the class declaration in `byte_stream.hh`

template <typename... Targs>
void DUMMY_CODE(Targs &&... /* unused */) {}

using namespace std;

ByteStream::ByteStream(const size_t capacity) : stream_capacity(capacity),byte_written(0),byte_read(0),byte_stream(0),_end(false),_error(false){
    DUMMY_CODE(capacity);
}

size_t ByteStream::write(const string &data) {
    DUMMY_CODE(data);
    //取其中的较小值,data的长度,bytestream的容量和deque长度的差,保证其不超过bytestream容量
    size_t lens_byte = std::min(data.size(),stream_capacity - byte_stream.size());
    //在deque的末尾插入data的数据
    byte_stream.insert(byte_stream.end(),data.begin(),data.begin()+lens_byte);
    //写入的长度增加
    byte_written+=lens_byte;
    return lens_byte;
}

//! \param[in] len bytes will be copied from the output side of the buffer
string ByteStream::peek_output(const size_t len) const {
    DUMMY_CODE(len);
    return std::string(byte_stream.begin(),byte_stream.begin()+std::min(len,byte_stream.size()));
}

//! \param[in] len bytes will be removed from the output side of the buffer
void ByteStream::pop_output(const size_t len) {
    DUMMY_CODE(len);
    //其实在实际情况下并不需要求较小值,但是为了通过单个测试,必须要求较小值
    size_t lens_byte = std::min(len,byte_stream.size());
    //删除这些数据
    byte_stream.erase(byte_stream.begin(),byte_stream.begin()+lens_byte);
    //已经读取的数据增加
    byte_read+=lens_byte;
}

//! Read (i.e., copy and then pop) the next "len" bytes of the stream
//! \param[in] len bytes will be popped and returned
//! \returns a string
std::string ByteStream::read(const size_t len) {
    DUMMY_CODE(len);
    //找到要read的长度byte_stream长度的较小值,尽可能地读
    size_t lens_byte = std::min(len,byte_stream.size());
    //读取数据
    std::string n(byte_stream.begin(),byte_stream.begin()+lens_byte);
    //将读取后的数据弹出
    pop_output(len);
    return n;
}

void ByteStream::end_input() {_end= true;}

bool ByteStream::input_ended() const { return _end; }

size_t ByteStream::buffer_size() const { return byte_stream.size(); }

bool ByteStream::buffer_empty() const { return byte_stream.empty(); }

bool ByteStream::eof() const { return _end&&byte_stream.empty(); }

size_t ByteStream::bytes_written() const { return byte_written; }

size_t ByteStream::bytes_read() const { return byte_read; }

size_t ByteStream::remaining_capacity() const { return stream_capacity-byte_stream.size(); }
实验结果如下: